Hello, I would like to share 16 Advanced Developer Options Android Hidden Features with you for Advanced Users.
If you use an Android phone, you might have seen something called Developer Options. Most people never open it, but this menu is full of powerful tools that can make your phone faster, smarter, and more customizable.
Android phones have a hidden world known as developer options Android. Developers mostly use these features to test apps and debug, but if you are going to discover the first time, then don’t worry,
I’m going to help you on Advanced Developer Options Android through this article in a beginner-friendly way so you can use them safely by following the given instructions.
By enabling or disabling developer options Android, hidden features, you can get your Android smartphone or tablet experience to the next stage.
Most of the latest phones come with developer options enabled, but if you can’t find them on your phone, you can enable them by following the options listed below.
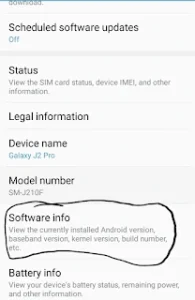
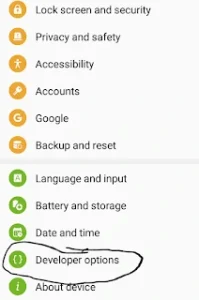
If you can’t locate the Android Developer options anywhere on your smartphone or tablet, go to the settings menu, scroll down, and you’ll see “About phone.” Click on it.
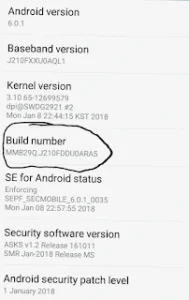
Scroll down to the bottom you will see “Build number”. If there is no, then you will see “Software Info” and open it.
Then, you’ll find “Build Number” and tap it 6-7 times.
Now you’ve got the developer options android settings back.
Tip: If you open something that you don’t know, then don’t worry, you can always turn off developer options android at the top of the menu.
The top 16 features of an Android developer are given below:
16 Advanced Developer Options Android Hidden Features
Android developer options are hidden settings designed for advanced control. They give users and developers access to tools like USB debugging, background process limits, performance monitoring, and more.
By using these features, you can test apps, troubleshoot, optimize system behavior, and customize your Android experience.
Enabling Developer Mode allows you to experiment with your phone and learn more about how Android works.
Now, let’s discuss 15 developer options that can help you discover more about Android.
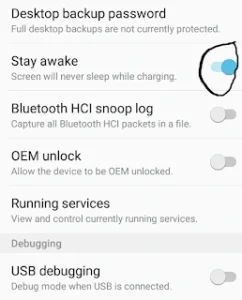
1. Stay Awake screen While Charging
Stay awake, enable the option here so Android will keep on your device screen on while charging, which means your phone display won’t turn off automatically.
You can enable this option while you are doing something important, and you need to keep checking your phone while charging as well.
It can make it easier for you to check your phone without unlocking your device. But keep in mind that you have to enable it if there is something important; otherwise, it will drain your battery very fast, so keep it off in normal times.
You can do that with these two steps. Go to Settings>Developer Options. Tap on Stay Awake and tickit.
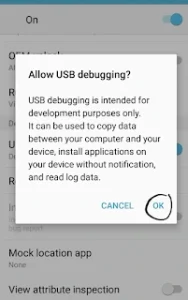
2. USB Debugging
You probably have already noticed that many Android-related devices on your PC need to enable USB debugging for the device to operate properly.
Because it is not enabled, the device can not establish a connection between your device and the desktop.
By enabling this, it can make app development, troubleshooting, and software testing much faster and more efficient. USB debugging is also used for many other tasks, like rooting, flashing firmware, or transferring advanced data.
NOTE: It should be enabled only when you are doing a task, and then disabled for security reasons.
Enable USB debugging by following the steps mentioned below: Go to Settings > Developer Options. Tick the USB Debugging checkbox.
When you’re prompted with the message saying “Allow USB debugging?” and you need to select ok
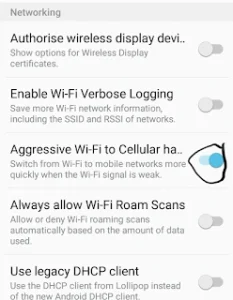
3. Aggressive WiFi to Cellular Handover
When this feature is turned on, your Android will automatically switch to mobile data if you do not have a strong Wi-Fi connection.
This feature may save your battery because your phone doesn’t have to strain too much to get those weak wifi signals; it automatically shifts to mobile data.
You can enable this feature if you’re out and doing something important, you have a reliable internet connection, and you have enough data available.
At that time, you can enable “Aggressive WiFi to Cellular Handover” to make sure no internet connection drops until you finish.
Enable Aggressive WiFi to Cellular Handover by the following steps:
Go to Settings > Developer Options, tap on Aggressive wifi to Cellular Handover, and tick it
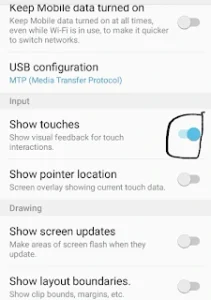
4. Show Touches on Screen
When you enable it, you can see where you touched. If you’re recording your screen, it’s useful for you.
Enable Show Touches on Screen by following the steps:
Go to Settings > Developer Options, tap on Show Touches, and tick it
5. Force 4x MSAA
If you like to play games on your Android device and if you’re using a high-end Android device, you can enable MSAA to get high-quality rendering on gameplay graphics. To enable Force 4x MSAA:
Go to Settings > Developer Options.
Tap on Force 4x MSAA to enable it.
6. Animation Scale Settings
Animation Scale Settings control how fast things move on your phone’s screen. These settings change how quickly menus open, apps appear, and transitions happen.
Lowering the animation scale ( 0.5x or Off ) can make your phone speed boosts and more responsive. Increasing the scale slows everything down but makes movements look smoother.
You can even turn animations off if you want instant screen changes. These tools do not harm your phone or affect app safety. They simply change the visual speed of movement on your device. You must enable Developer Options before you can adjust these settings.
7. Pointer Location
Pointer Location is a debugging tool in Android’s Developer Options that shows the exact position of touches on your screen.
When turned on, it displays crosshair lines and real-time coordinates at the top of the screen,
It’s helping developers see how and where the screen is being touched. It is mainly used for testing apps and checking touch responsiveness.
You can see from the attached video below for more information.
8. Limit Background Processes
These Developer Options mode controls Android Developer Options how many apps can run in the background. When you reduce this limit, your phone keeps fewer apps active, which can improve performance and save battery.
But your apps may reload slowly because they can’t stay open in the background.
9. Force Dark Mode
These Developer Options feature that makes apps use a dark theme even if they don’t officially support it. These features can help reduce eye strain and can save battery on OLED screens, but some apps may not display perfectly because of their built-in normal design.
10. OEM Unlocking
These Developer Options allow you to unlock your phone’s bootloader. Turning it on lets you install custom software or ROMs, but it can also erase your data and may void your warranty. It’s meant for advanced users who want full control over their device.
The Developer Options tool lets you see which apps and processes are currently running on your Android device. It shows how much RAM each app is using, helping you understand what might be slowing down your phone or draining memory.
12. Force Apps to Resize
Force Apps to Resize is a Developer Options setting that makes apps adapt to different screen sizes or split-screen mode, even if they weren’t designed for it. It can improve multitasking on large or foldable screens, but some apps may not look perfect or may behave oddly.
13. Mock Location App
Mock Location App is a Developer Options feature that lets you choose an app to fake your phone’s GPS location. Developers use it for testing location-based apps, but it can also be used for fun, like pretending you’re somewhere else on the map.
14. Bluetooth Audio Codec Control
Bluetooth Audio Codec Control in Developer Options lets you choose how your phone sends sound to Bluetooth headphones or speakers. Different codecs can improve audio quality, reduce lag, or save battery.
It’s useful for getting the best sound performance from your Bluetooth devices.
15. GPU Rendering Profile
GPU Rendering Profile is a Developer Options tool that shows how smoothly your phone’s graphics are running. It displays bars or lines that represent how long each frame takes to render.
Developers use it to spot lag or performance issues, but it’s also handy for tech-savvy users who want to see how well their device handles animations.
16. Background Check
Background Check is a Developer Options tool that shows which apps are running in the background and using system resources. It helps you monitor memory and battery usage, making it easier to spot apps that might be slowing down your phone.
Which Developer Options Mode in Android do you like most?
If you like this, then please don’t forget to share it with your friends. If your confusion is not clear about Android Developer Options Hidden Features For Advanced Users, then comment below.
We already discussed Android Developer Options Hidden Features For Advanced Users. Now your turn to tell me which Android Developer Options Hidden Features For Advanced Users you like most? Please comment below.
Safety Tips to Use Developer Options Android
Don’t change all the settings at once
Read what the feature does before enabling it
If something goes wrong, turn off developer options immediately from the top of the menu
Avoid enabling advanced features that you don’t understand (features like: Mock Location, OEM UNLOCK, etc.)
Advanced Developer Options Android allows many powerful features that can improve your phone’s performance. These features are usually meant for developers, but advanced users can also benefit from them in simple and effective ways.
By exploring options such as animation controls, better graphics settings, background process limits, and USB debugging, you can make your phone faster and more efficient.
The most important thing is to use these settings very carefully. If you use some options incorrectly, then it may change how your device behaves or affect your device’s performance.
Always adjust one setting at a time and make sure you understand its purpose before enabling it. Advanced Developer Options Android allows users to control their Android device, helping improve their performance on their phone.
With the right knowledge, or at least by using the above-mentioned hidden developer features with basic knowledge can turn your Android experience into a smarter and smoother one.